
The most common question we’re asked is:
How do I start recording songs that sound professional?
You can record very high-quality music with:
✓ free software
✓ inexpensive hardware
✓ a bit of knowledge / practice.
Our free guide will show you all of this, step-by-step.
The gear, software and services listed in this guide are either FREE
or as inexpensive as possible without sacrificing quality.
MICROPHONES
If you are an artist who plans on releasing music to the public, you need to use a microphone that is designed specifically for capturing vocals to get a high quality recording.
Using a computer microphone (or the one on your mobile phone) is fine for recording personal demos or fleshing out song ideas. But you can’t publicly release music recorded this way.
If you have any plans to release the music online, a high-quality microphone is absolutely necessary.
You can get a high-quality microphone for as cheap as $40 USD.
You will need to choose between two types of microphone:
dynamic and condenser
DYNAMIC MICROPHONE
For both home-studio use and live-show use
Generally less sensitive, not as good for gentle vocals or singing
Suitable for loud vocal styles, such as hard rock or aggressive rapping
CONDENSER MICROPHONE
Primarily designed for studio use only
Generally more sensitive, but can pick up unwanted noise
Suitable for singing, rapping and voice-overs
INEXPENSIVE MICROPHONES
FOR HOME RECORDING
High quality doesn’t have to mean expensive — which is why we put together our short list of inexpensive microphones (ie. under $100) you should consider investing in as an up-and-coming artist.
These are traditional microphones (ie. not USB microphones) and will require you to purchase an audio interface to record vocals onto your computer.

Behringer C-1
The Behringer C-1 Condenser Microphone is most inexpensive microphone for a home recording setup that we recommend.
This is a condenser microphone that is meant for home studio use. It is not typically used in a live-music setting.
If you want professional quality recordings at the cheapest price, this is the mic for you. Anything we tested cheaper than this had serious quality issues that would negatively impact an artists songs.

MXL 990
The MXL 990 Condenser Microphone is a great entry-level microphone for a home recording setup.
This is condenser microphone that is meant for home studio use. It is not typically used in a live-music setting. Some aren’t a fan of its look, but its aesthetics should come secondary to its capacity to record professional quality audio.
A great part about the MXL 990 is that it comes with some useful hardware - a shockmount and a mic stand adapter.

SHURE SM58
The Shure SM58-LC Vocal Microphone is virtually the gold standard for those who want high-quality, durability and versatility in an inexpensive microphone.
The SM58 can be used for both home-recording and live shows, and it performs admirably in both scenarios. Industry pros have used this microphone for years, no doubt you will be happy with this microphone.
Because this is a dynamic microphone, it is more suited to aggressive vocal styles such as hard rock or rapping.
AUDIO INTERFACE
Your microphone will need some way to plug-in and communicate with your computer - this is where an audio interface comes in.
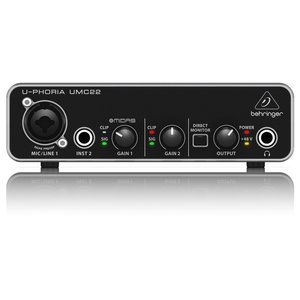
Behringer UMC22
The Behringer UMC22 Audio Interface is the most inexpensive audio interface for a home recording setup that we recommend.
This is a solid unit that does exact what you need it to — it takes the feed from a microphone and routes it to your computer via USB connection, enabling you to save your recordings on your computer.

Focusrite Scarlett Solo
The Focusrite Scarlett Solo Audio Interface is a step-up from the UMC22 and (if it’s in your budget) well worth the extra cost.
A bonus is that the unit comes with Pro Tools and some other software options that you can use for the recording process.
RECORDING SOFTWARE
Once your hardware is in place, you will need to install recording software onto your computer.
There are dozens of Digital Audio Workstations - sometimes called DAWs - to choose from online.
Most will run you a few hundred dollars.
Thankfully, there’s Audacity — free, open source recording and audio editing software.
Audacity has all integrated features for beginners and aspiring-to-learn musicians that want to start recording their music and make it sound professional. While it may look a bit complex at first, the software is fairly user-friendly once you know the basics.
Installing Audacity
Installing Audacity is a simple process — access their official website and go to the “download” tab at the topcenter of the page. Select the operating system you have (Windows, Linux or Mac) — a new page will open, download the latest version which should be the first download link.

Once the download is finished, install the program, we are ready to get started!
Interface & Basics
We will only the most basic tools first - the ones that will be necessary to record and edit a “track”.
A ‘track’ is a bar that will visualize the audio or sound signal that is recorded or loaded into Audacity.
It can sometimes be referred to as the ‘soundwave’ or ‘waveform’.
When you open Audacity for the first time, it should look like this:


The first section of Audacity is the Transport Toolbar, in order from left to right we have:
Pause: Pauses playback and/or recording.
Play: Plays the track or audio displayed.
Stop: Stops playback/recording.
Skip To Start: Jumps to the beginning of the track.
Skip To End : Jumps to the end of the track.
Record: Begins the recording process as soon as you hit Play.
Editing & Selection Tools
Lets overview the basic editing and selection tools.

Top Left to Right — Selection, Envelope & Draw Tool
Bottom Left To Right — Zoom, Time Shift & Multi Tool
Selection Tool: This allows you to click wherever you want to play your song from. If you click and drag, you can select sections of your track to edit or delete.
Envelope Tool: This allows you to modify the volume by drawing a parameter on your recorded audio track. This can be very helpful with vocals due to the natural dynamic volume range of the human voice.

Example of the envelope tool applied to a track:
Draw Tool: This allows you to modify the volume nodes. When you zoom in very closely to your track with the Zoom Tool, volume nodes are visible.

Being able to modify these helps remove loud sound ‘peaks’ that may cause unwanted noise in your song.
Zoom Tool: As the name suggests, left-clicking your mouse will zoom in on the track and right -clicking will zoom out.
Time Shift Tool: All the tracks and audio recorded in Audacity sit on a timeline. Using the Time Shift tool, you can to move the whole track or a selection of the track to a desired time.
Let’s say that you recorded one of your vocals a second late, you can use the Time Shift tool to move your track to where it should belong in the song. We recommend you do this along with the Zoom Tool for accuracy.
MICROPHONE SETUP, TRACKS & EDITING BASICS
Before you can begin working in Audacity, you must plug your Audio Interface into your computer and install all the necessary drivers. There is most likely an instruction manual that came with your Audio Interface that instructs you how to do this.
To select your audio interface and microphone, click on the highlighted yellow area in the image below.

This is the Device Toolbar, your audio interface should be in this tab if installed correctly. The tab to the right of the yellow highlighted one chooses Mono or Stereo recording mode. For vocals, we recommend sticking with Mono. With the next tab to the right, you can select the Output — your computer speakers, headphones, etc.
At this time, click the red “RECORD” button above it to do a test recording.
